As Amazon Associates, we earn from qualifying purchases. This means we may receive a small commission at no extra cost to you if you click through and make a purchase.
Getting a smooth, reliable first layer is one of the steepest learning curves in desktop 3D printing, and the Creality CR Touch is an add-on sensor designed to take that manual frustration out of the equation. Sold under the Comgrow brand for Creality machines, this small accessory attaches directly to your print head to automatically map out high and low spots across your print surface. If you are tired of sliding pieces of paper under your nozzle before every single print, this sensor delivers an effective hardware upgrade that brings dependable automated compensation to your workshop.
This auto bed leveling kit is an ideal match for beginners and hobbyists who own a modern Creality printer and want consistent bed adhesion without endless thumbwheel adjustments. However, it is not a universal drop-in part for every machine in existence. Shoppers running older printers with legacy 8-bit mainboards will need to look elsewhere or upgrade their internal electronics first, and anyone uncomfortable flashing firmware via an SD card might find the setup process slightly intimidating.
Creality CR Touch at a Glance

| Feature | Specification |
|---|---|
| Brand | Comgrow |
| Probe Mechanism | Retractable metal push pin |
| Mainboard Compatibility | 32-bit V4.2.2 and V4.2.7 mainboards only |
| Compatible Printer Models | Ender 3, Ender 3 V2, Ender 3 Pro, Ender 3 Max, Ender 5, Ender 5s, Ender 5 Pro, CR-10 |
| Supported Print Surfaces | PEI sheets, textured stickers, glass beds, bare metal plates |
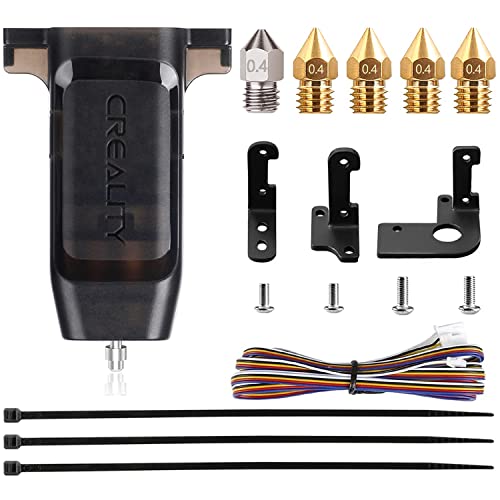
| Mounting Hardware | 3 distinct mounting brackets included |
| Product Dimensions | 2.48 inches D x 1.61 inches W x 3.93 inches H |
| Item Weight | 0.12 kg |
| Color and Material | Black plastic casing with metal probe |
Bed Leveling Precision and Mesh Generation
The primary reason to consider this upgrade is eliminating first-layer failures caused by an uneven or warped build surface. In standard manual operation, desktop 3D printers require you to twist four corner bed knobs repeatedly while gauging clearance with a sheet of paper. Even when all four corners appear level, manufacturing variations in aluminum build plates often leave subtle dips or high spots across the middle of the platform. The sensor solves this by executing automated multi-point detection across the entire printing area, recording the precise physical height of each probed coordinate.
Once the sensor finishes measuring the designated points, the printer firmware constructs an invisible digital elevation map of the surface. During actual printing, the machine uses this map to continuously adjust the height of the nozzle as it travels across different areas of the plate. This dynamic Z-axis compensation ensures that extruded plastic goes down with uniform squish, preventing corners from peeling off or nozzles from gouging into high spots. Automating repetitive manual steps like this can transform your overall experience, much like how switching from manual brewing to an automated appliance like the de’longhi magnifica start automatic espresso machine removes the guesswork from everyday routines.
Achieving stable ender 3 auto bed leveling does not mean you can ignore physical maintenance entirely, but it drastically widens your margin for error. Instead of recalibrating corner wheels between every model, the automated routine accounts for slight thermal shifts, bed expansion, and mechanical vibration. The result is fewer failed prints, less wasted filament, and far greater peace of mind when starting a print job remotely or leaving the room while the initial outline goes down.
Hardware Build Quality and the Metal Push Pin
Physical durability is a central selling point when evaluating the cr touch specs against competing probes. Many aftermarket leveling sensors utilize plastic deployable pins that can bend, snap, or soften when exposed to high heat or accidental nozzle collisions. In contrast, this unit features a rugged cr touch metal push pin housed within a sturdy black plastic shell. The metal pin resists physical wear and maintains its straight cylindrical profile even after thousands of probing cycles against tough surfaces.
When comparing cr touch vs bltouch accessories, the internal design philosophy stands out immediately. The BLTouch has long been an industry standard, but its molded plastic pin remains vulnerable to accidental bed crashes or snagging on curled plastic edges. The metal push pin design on this sensor provides longer operational life and structural rigidity. When probing, an internal mechanism lowers the metal pin, senses physical contact with the build plate, and immediately retracts the pin upward into the housing to keep it safely out of the way of the hot nozzle during printing.
The overall construction feels compact and purposeful. Measuring 2.48 inches deep, 1.61 inches wide, and 3.93 inches high, with a total weight of just 0.12 kg, the sensor adds minimal mass to the moving X-axis carriage. Keeping toolhead weight low is crucial for desktop 3D printers, as excess bulk can cause unwanted ringing or ghosting artifacts in finished models during rapid directional changes.
Installation Workflow and Physical Mounting
Mechanical installation is straightforward thanks to the modular hardware provided in the box. Because toolhead designs differ slightly across Creality machines, the kit includes three different kinds of mounting brackets. Whether you are mounting the probe to an original Ender 3, an Ender 3 V2, an Ender 3 Max, an Ender 5 Pro, or a CR-10, you can select the specific bracket that lines up with the pre-drilled screw holes on your printer carriage. Securing the bracket requires basic hex keys and only takes a few minutes of assembly.
An essential mechanical step during cr touch installation is disconnecting and removing your factory Z-axis limit switch. On stock machines, a mechanical click switch mounted to the vertical frame tells the printer when the nozzle has reached the bottom of its travel. Because the probe now handles both bed leveling and vertical homing directly at the print surface, the old limit switch becomes completely redundant. Leaving the old switch in place can physically block the carriage from moving low enough for the probe to touch the bed, so detaching it is a required part of the upgrade process.
Routing the single wiring harness back to the mainboard enclosure is clean and orderly. Much like modern smart hardware upgrades around the home, such as replacing a traditional mechanical deadbolt with a level lock touch edition, taking the time to route your cables neatly prevents snags and ensures long-term operational safety. Once the wiring is tucked neatly alongside the main extruder loom, the physical setup is complete.
Firmware Setup and 32-Bit Mainboard Compatibility
While the hardware side of the creality cr touch setup is simple, software configuration requires careful attention to detail. This sensor requires a 32-bit mainboard to function properly, specifically Creality boards designated as V4.2.2 or V4.2.7. If your printer still runs an older 8-bit board—common on early Ender 3 production runs—the sensor cannot interface with your machine without a full mainboard replacement. Checking the version number stamped directly on your green circuit board before purchasing is the best way to verify compatibility.
To enable the sensor, you must update the printer firmware using the machine micro-SD card. The manufacturer directs users to download the appropriate firmware file matching their exact printer model and mainboard version from the official Creality website. Once you copy the correct file to an empty SD card and power on the printer, the system automatically flashes the new software. This firmware update replaces standard manual bed menus with dedicated leveling routines and Z-offset adjustment options.
After flashing the firmware, dialing in your Z-probe offset is the final critical step. The offset tells the printer the exact vertical distance between the tip of the deployed metal pin and the tip of the brass nozzle. Because the probe touches the bed before the nozzle does, setting this numerical offset correctly in the printer menu ensures the nozzle drops to the perfect layer height when printing begins. Once saved to memory, the offset rarely needs readjustment unless you change nozzles or dismantle the hotend assembly.
Build Surface Versatility Across PEI, Glass, and Metal
A notable advantage of this physical contact probe is its universal compatibility with practically every build plate material on the market. Some leveling upgrades rely on inductive or capacitive proximity sensors, which can only detect conductive metals or produce erratic measurements over uneven glass coatings. Because this unit relies on a physical metal push pin that mechanically depresses upon contact, it registers genuine physical touch regardless of what material lies beneath it.
The kit works reliably across standard tempered carborundum glass beds, textured PEI spring steel sheets, magnetic flexible stickers, and bare aluminum plates. Glass beds are popular for their flatness, but they can be slightly thicker and heavier; the probe maps their surface effortlessly. Textured PEI sheets are praised for excellent adhesion, and the metal pin glides against the rough texture without catching or wearing down. This broad adaptability ensures that you can swap your printing surface whenever you like without having to recalibrate or replace your leveling sensor.
Having a dependable physical sensor also accommodates minor imperfections that develop on build plates over time. Removable magnetic stickers often trap tiny air bubbles or bits of stray filament underneath them after repeated use. While manual leveling cannot compensate for localized bumps, the multi-point probing routine detects these subtle height differences and smooths them out across your first layer.
Creality CR Touch Pros and Cons
Two swatches, side by side. Everything on both sides is read from the product listing and from buyer feedback – nothing here comes from handling the product.
What works
- Durable metal push pin construction
- Three distinct mounting brackets included
- Works across PEI glass and metal beds
- Automated multi-point height compensation
- Direct compatibility with 32-bit Creality boards
What to check
- Incompatible with older 8-bit mainboards
- Requires manual firmware flashing via SD card
- Requires removing factory Z-axis limit switch
Who Should Buy the Creality CR Touch
Buy It If
- You own an Ender 3, Ender 3 V2, Ender 3 Pro, or Ender 5 equipped with a 32-bit V4.2.2 or V4.2.7 mainboard.
- You are tired of manually leveling your bed with paper sheets before every print and want automated Z-axis compensation.
- You print on diverse bed materials like glass, PEI, or magnetic stickers and need a sensor that works on all of them.
- You want a durable metal push pin that will not bend or melt during extended printing sessions.
Skip It If
- Your printer still runs an older 8-bit Creality control board and you do not plan on upgrading the electronics.
- You are uncomfortable downloading, formatting, and flashing firmware updates onto your printer via an SD card.
- Your manual leveling is already flawless and you prefer simple stock hardware without extra electronic components.
Final Verdict
The cr touch ender 3 sensor kit is one of the most practical and reliable upgrades available for compatible Creality machines. By replacing guesswork and manual paper tests with an automated multi-point detection mesh, it directly addresses the primary cause of adhesion problems and warped first layers. The inclusion of three specialized mounting brackets and a durable metal push pin gives it a clear edge over fragile alternatives that rely on flexible plastic parts.
While the requirement for a 32-bit mainboard and the necessity of flashing firmware mean it is not an entirely plug-and-play modification, the process is well documented and manageable for beginners. If your printer has the correct board and you want to spend more time printing parts and less time twisting bed leveling knobs, this leveling kit is well worth adding to your setup.
FAQ
How does the CR Touch differ from a BLTouch sensor?
While both perform automated bed leveling by measuring physical points on the build plate, the primary physical difference is the probe pin material. This kit uses a retractable metal push pin housed in a rigid plastic shell, offering greater resistance to bending, wear, and heat compared to the soft plastic push pins typically found on BLTouch devices.
Can the CR Touch work on an older 8-bit Ender 3 mainboard?
No, the listing notes specifically confirm that this sensor is only compatible with 32-bit V4.2.2 and V4.2.7 mainboards. If your 3D printer still has an older 8-bit motherboard, you would need to upgrade to a compatible 32-bit board before this sensor can be installed and operated.
Do I need to keep the original Z-axis limit switch installed?
No, the installation instructions state that you must remove the original Z-axis mechanical limit switch from the frame. The probe takes over the physical vertical homing duties, and leaving the mechanical switch in place would physically block the print head from descending low enough for the probe to touch the bed surface.
What bed surfaces are compatible with the CR Touch probe?
Because the sensor relies on a physical contact pin rather than magnetic or inductive detection, it is fully compatible with PEI sheets, textured build stickers, tempered glass plates, and bare metal beds. It touches the surface directly regardless of material composition.
How do I install the firmware for the CR Touch on my printer?
You select the appropriate bracket and install the hardware, remove the Z-axis switch, and then download the matching firmware file for your printer model from the official Creality website. Copy that file onto your micro-SD card, insert it into the printer while turned off, and turn the power on. The 32-bit mainboard will automatically update its firmware from the card upon startup.
Prices and specifications above are read from the product page and can change without notice. Scores are out of 10, based on listed specifications and buyer feedback; nothing on this page comes from handling the product.